Once your Ad Grant account is approved, it’s time to learn how to set up an effective campaign that will increase your nonprofit’s digital presence. This guide is a handy step-by-step guide for beginners that will help you set up a Google Ad Grants campaign.
I. Settings and selection of campaign parameters
Step 1: Create an Ad Grants campaign (Google advertising)
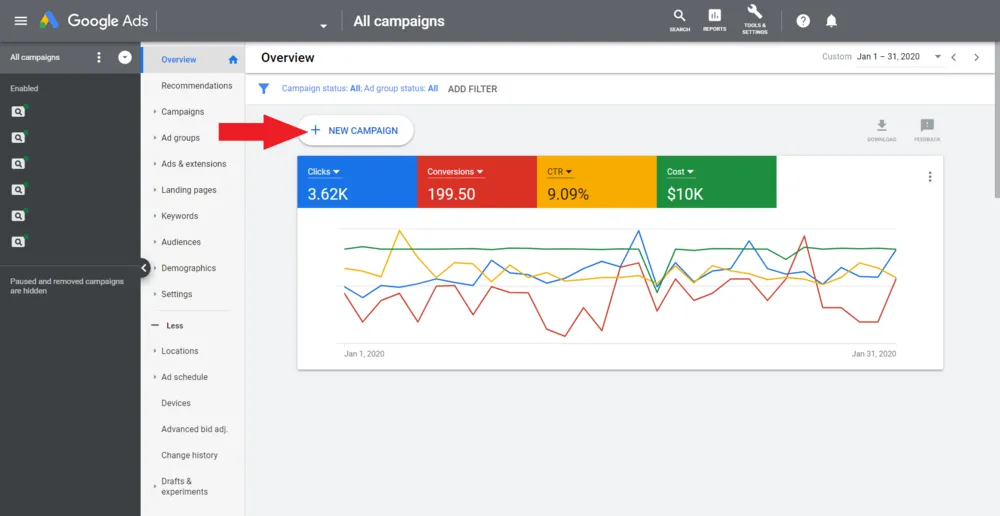
Sign in to your Google Ad Grants account, go to the Overview panel and click NEW CAMPAIGN.
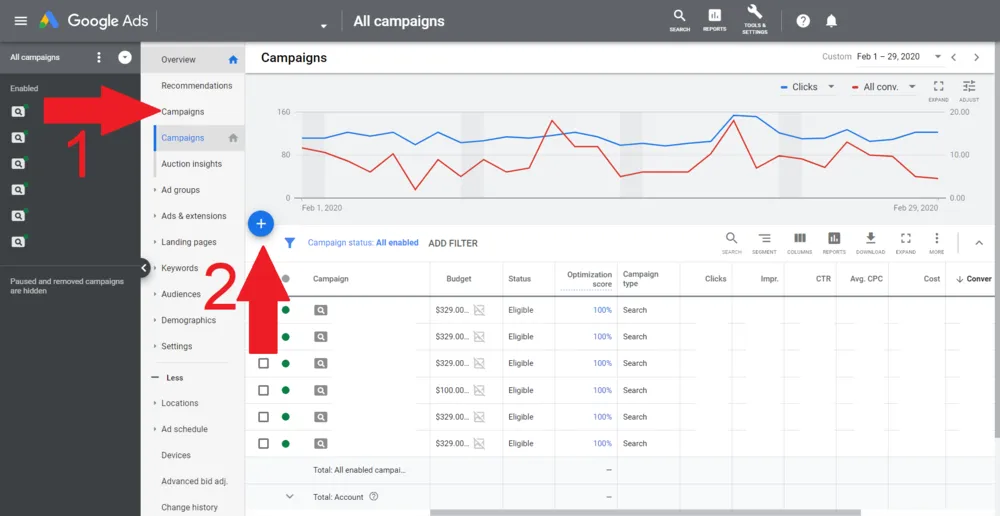
Another way to create a campaign is to click the Campaigns menu in the sidebar, click the blue (+) and select New Campaign.
Step 2: Purpose and type of campaign
A. Choose the goal you want your campaign to achieve. (You can only use one objective per campaign).

Learn more about each goal:
- Sales, if you want to encourage people to buy
- Potential customers, if you want to collect contact details and other information through the registration page
- Website traffic if you want more people to learn about your organization by visiting your site
- Product and brand awareness if you want people to learn more about the products and services you offer
- Brand awareness and reach if you want to reach a wider audience
- App (app) advertising if you want people to consider and install your app (app)
For Google Ad Grants accounts, you can only select ‘Sales’, ‘Leads’ or ‘Website Traffic’ as other objectives are not available for search advertising campaigns.
A. Next, you will need to select a campaign type. Each type has its own settings and determines where your ad will appear.
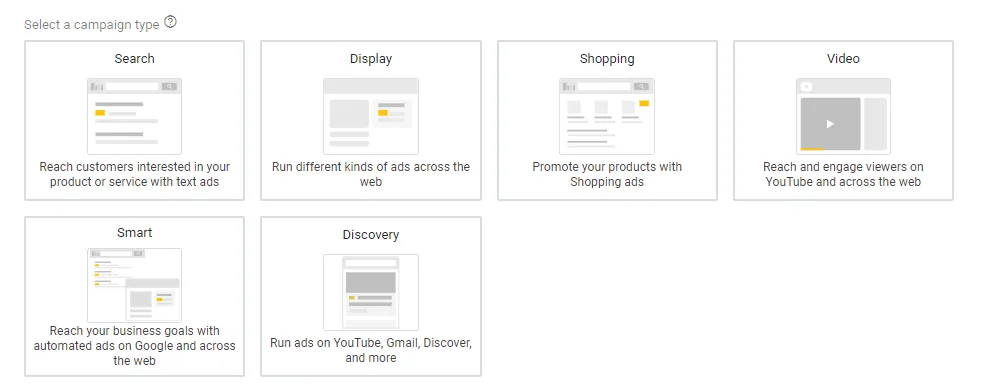
For non-profit organizations that receive $10,000 in free Google Ad Grants monthly advertising credit, select “Search” as the campaign type. This way, your ads will appear next to Google search results.
Step 3: Name and configure networks
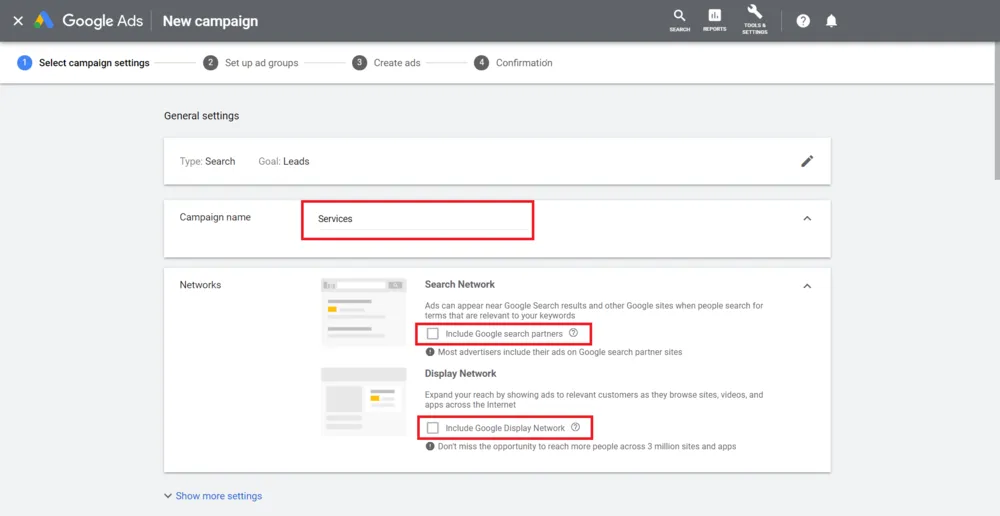
Enter a Google advertising campaign name and uncheck the Search and Display Network options.
Step 4: choosing geotargeting
Choose the relevant geotargeting for your campaign.
You can select a specific country, city or zip code.
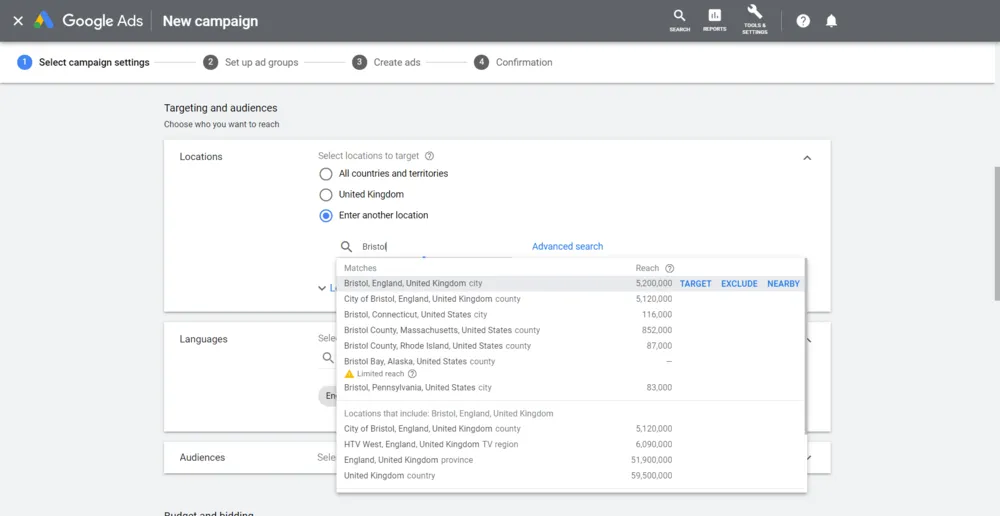
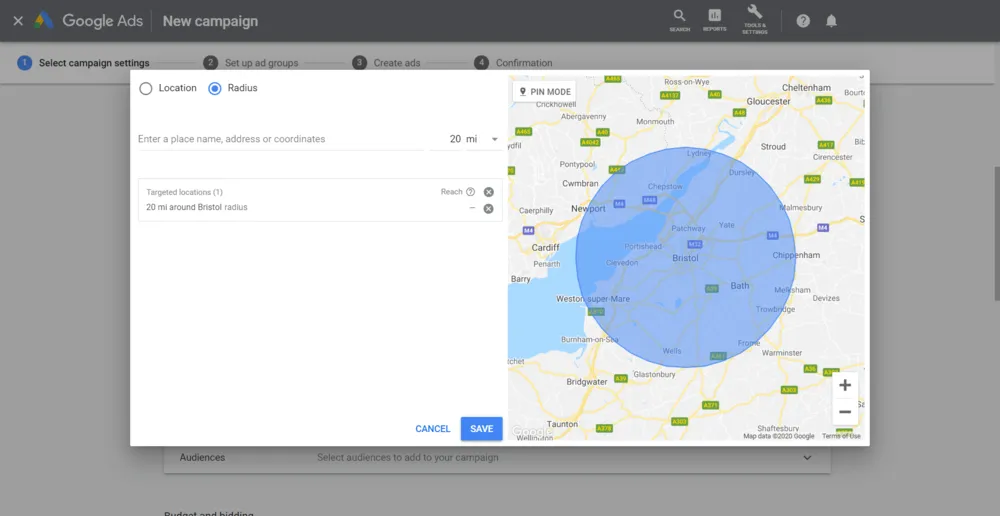
If you’d like your ads to be more targeted to a specific region, select the “Enter another location” option. Click “Advanced search” and enter the name of the place or its coordinates, then click “Save”.
Step 5: Campaign language
Choose the language that suits your nonprofit.

Step 6: Budget and Bidding Strategy
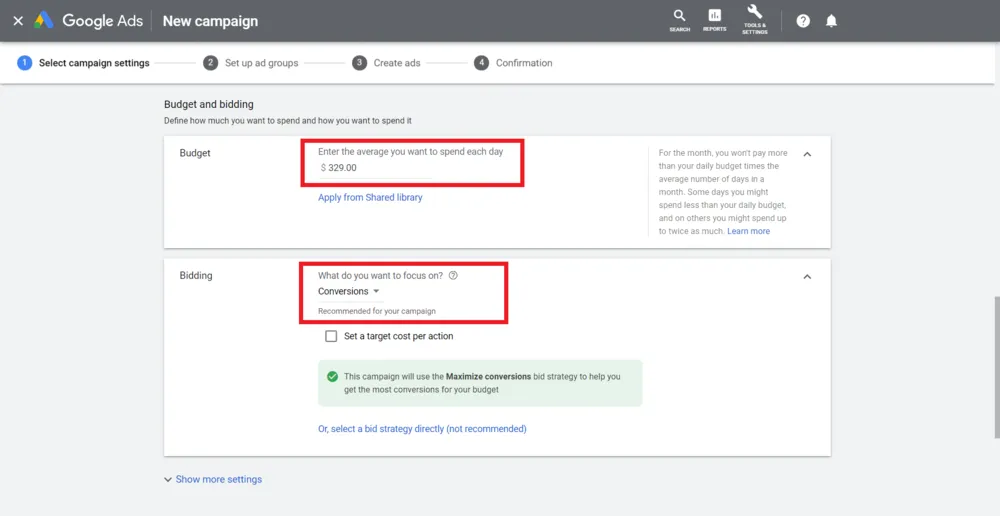
Set your campaign budget to $329 (for Google Ad Grants). Also, set the focus to the “Conversions” option.
Step 7: Additional Site Links and Extensions
Check out additional sitelinks, footnote extensions, and callouts. Click “Save and continue” – and your campaign is ready!
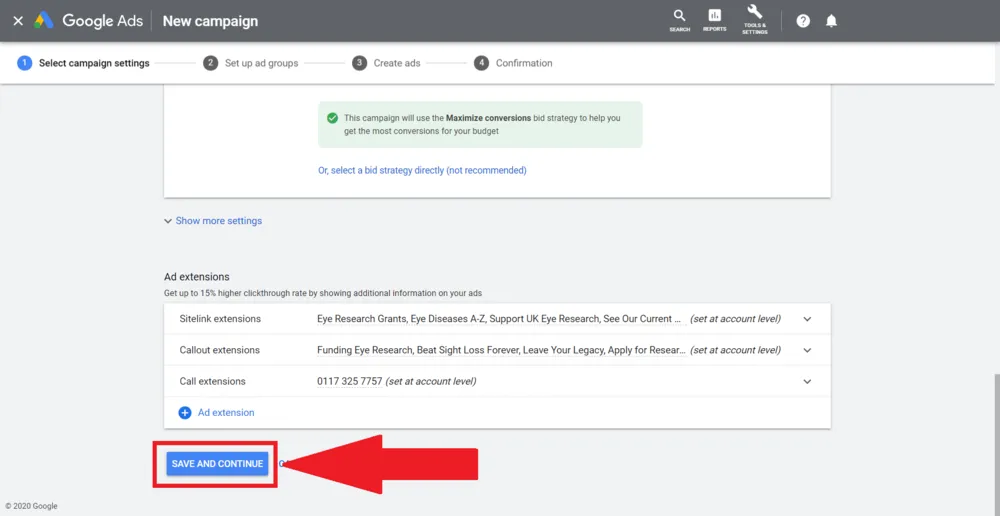
II. Setting up ad groups
Before you can start writing text ads that will appear in Google search, you need to create an ad group. A Google Ad Grants account must have at least two ad groups for each ad campaign. Ad groups act as a “container” for all your related keywords and make your PPC search strategy much more effective.
After clicking “Save and Continue” in the previous Google advertising campaign settings section, you will be directed to the ad group settings page. Next, we will talk about 4 simple steps of creating a group of ads.
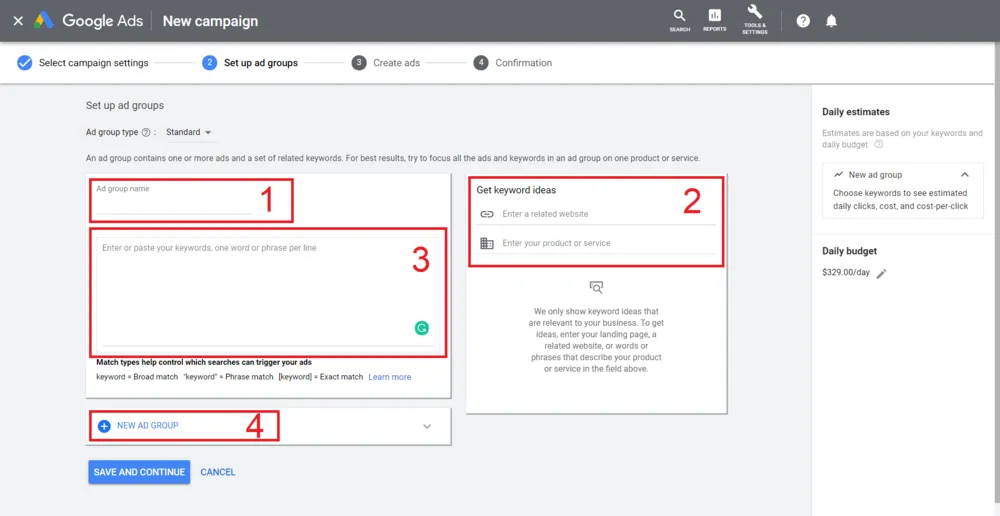
Step 1: Ad group name
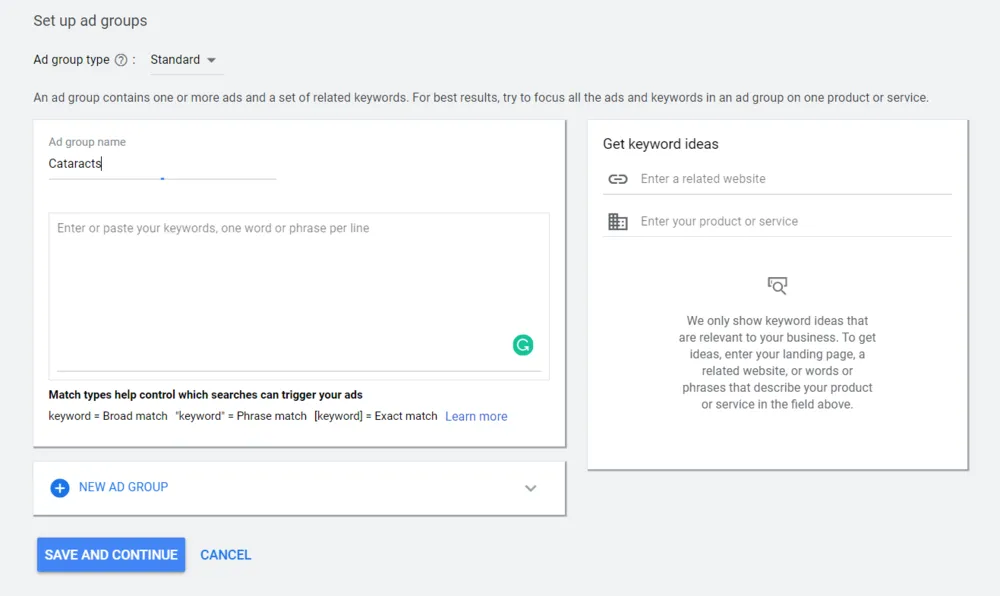
Decide on the name of the ad group – it is best to use a specific keyword or unifying topic of keywords that you plan to use.
For example, your organization helps people with vision disorders. For example, if you want to run a campaign about different eye diseases, you might have ad group titles like Cataract, Glaucoma, Conjunctivitis, Macular Degeneration, etc.
Step 2: Keywords
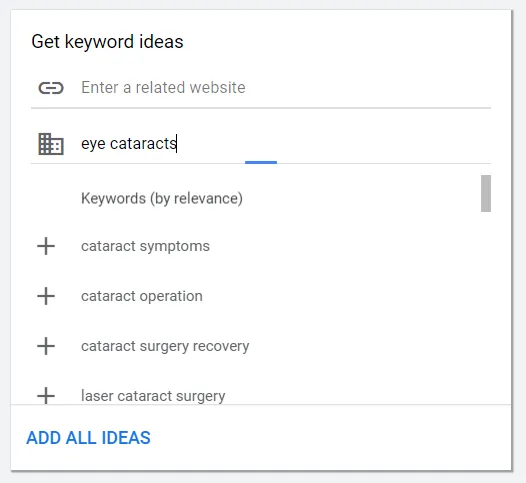
If you haven’t researched your keywords, or if you don’t have the time to do so, you can use Google’s keyword research tool. It’s on the right side of the ad group settings page. This tool can be useful for finding related keyword ideas.
If you see a relevant keyword, click the (+) sign in front of it. But don’t just mindlessly add all the keyword options offered by Google. Some of them may be irrelevant or more appropriate for another ad group.
Step 3: Add keywords
Make sure these keywords are closely related to each other.
You can use a combination of different keyword match types in each ad group to filter out irrelevant search terms.
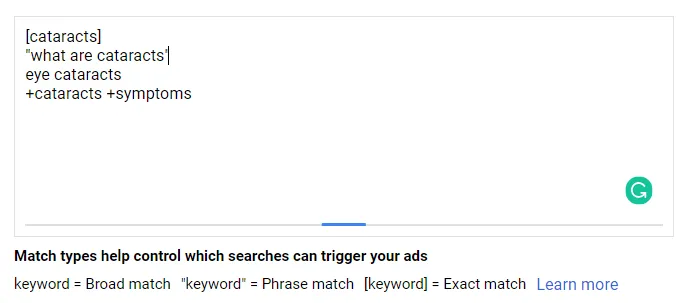
Step 4: Google Ad Grants eligibility rules
Google Ad Grants has established several rules that its grantees must follow. One of these is at least 2 ad groups for each active campaign.
So, on the ad group setup page, just click “NEW AD GROUP” at the bottom of the page and repeat step 1 for ad group setup.
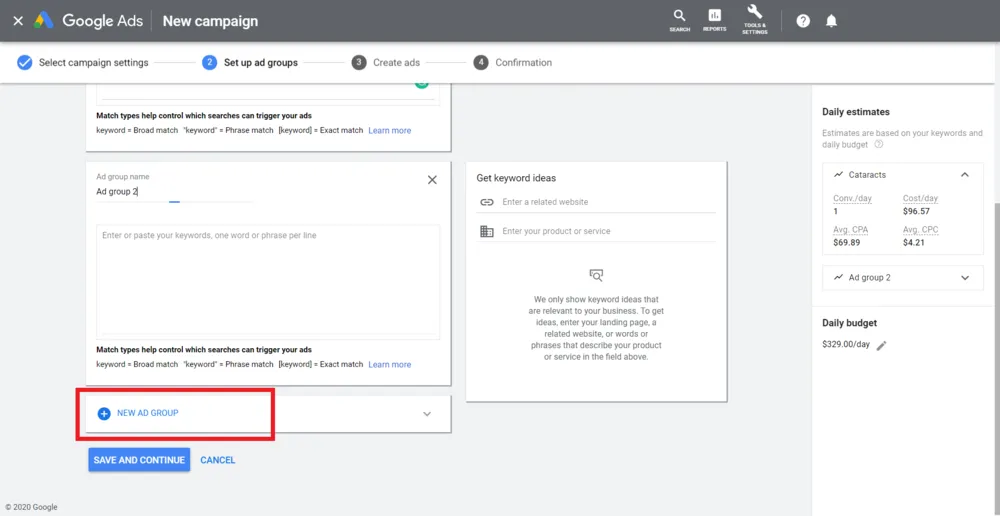
Once you have at least 2 ad groups with matching keywords, just click Save and Continue.
III. Creating your ads
This is how a text ad appears in Google search.
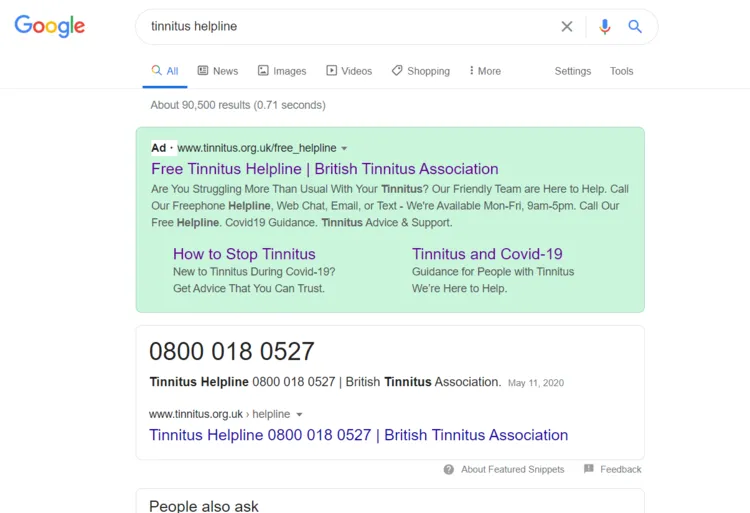
We have come to the last part – writing text ads. With them, non-profit organizations can increase their visibility by attracting more people to their website, attracting the attention of potential donors, attracting more volunteers, offering their services, and more.
However, it’s worth noting that if a non-grant paid advertiser is bidding on the same keywords as your organization, your Google Ad Grants ad will always appear below their paid ad.
Writing text ads is not as difficult as it seems. Here are the simple steps to set up text ads.
Fill out the following Google text ad fields
• Final URL
Enter the URL where you want anyone who clicks on your text ad to be directed; use a relevant landing page that matches the theme of your ad.
• Google advertising: Title 1
Include one of your keywords in the first headline to show the relevance of your ad to the user’s query.
• Headings 2 and 3
Use these headlines for your calls to action or unique product/organization benefits; don’t skip filling in these headers as they will help make your ad more visible (plus they won’t cost you any extra money).
• Way 1 and 2
These fields do not have to contain a working URL. But still fill in the boxes to give users an idea of what they’ll see when they click on your ad.
• Description 1 and 2
Use these fields to highlight more details about the service or product you are promoting. Include calls to action here to make the most of the 90 characters available.
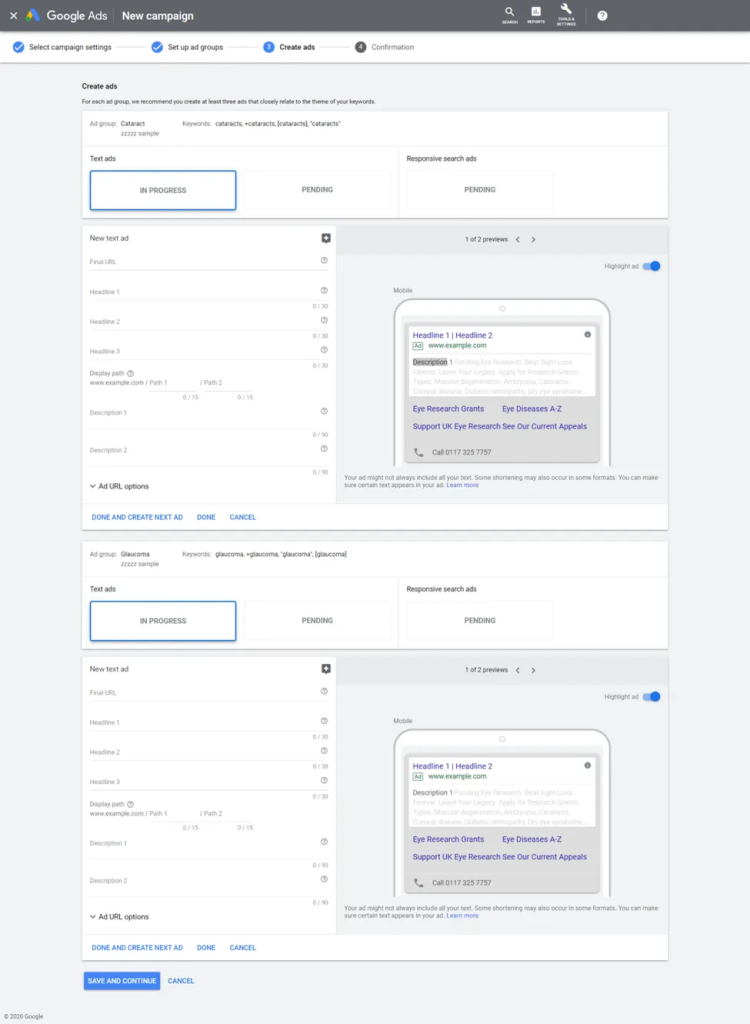
As we said, Google Ad Grants accounts must have at least 2 ads in each ad group. After filling in all the required fields in the first ad, proceed to create the next one by clicking the “Finish and create the next ad” button.
Having at least two text ads in your group gives you the opportunity to A/B test your calls to action, wording, or other aspects of your ad text. A/B testing or split testing your text ads can give you insight into which ads perform better. Based on your findings, you can make the necessary changes to your ads.
If you are satisfied with the created ads – click “Save and continue” to finally view the campaign settings.
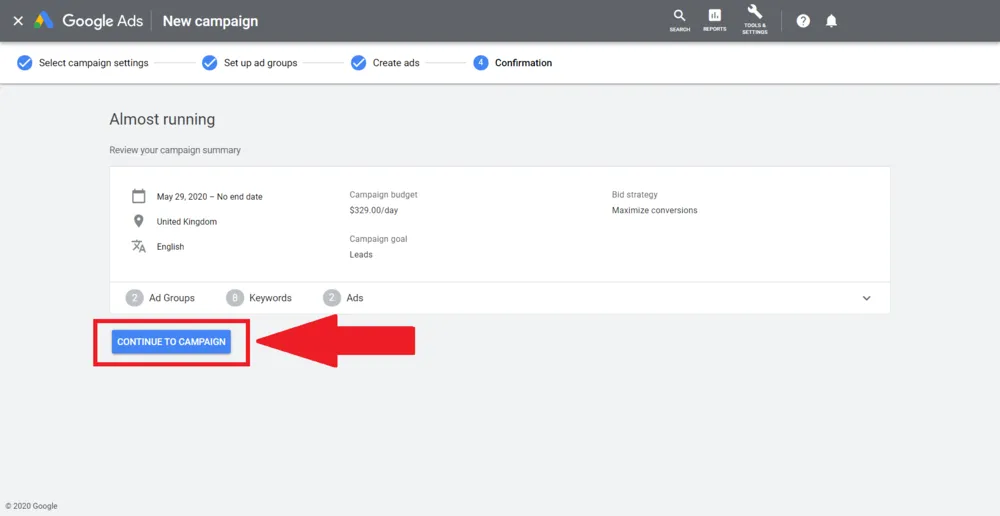
Finally, click “Go to Campaign”.
Begin by entering your first and last name to establish your identity. The next crucial step is providing your email address; remember, it must be a business, branded, or corporate email, as generic email addresses are not accepted. This is to ensure a professional level of communication and to filter out non-serious inquiries.
You are also required to include your website’s URL. This is vital as it gives context and allows for a preliminary assessment of your online presence, which is integral to the audit process. Furthermore, you must clarify your status regarding NGO registration or your interest in Google Ad Grants. This information is essential for tailoring the audit to your specific needs and circumstances.
After you have filled in all these details with precision and care, review them to ensure accuracy and completeness. Submitting accurate and comprehensive information is crucial for a meaningful audit.
Congratulations, you’ve set up your Google advertising and are ready to show your ads on Google Search!