Creating a Google Ads account structure is not as scary as it may seem at first glance. Yes, the Google Ads interface can be a bit difficult to navigate. However, this step-by-step guide will help you do everything you need to create a well-structured account. Also, remember that this framework is not permanent and will likely continue to change and evolve over time.
Why is Google Ads account structure so important?
Let’s take a step back – what does account structure even mean and why is it so important?
Simply put, how you structure your Google Ads account will give you control over
- how you want your ad to work and also
- when and where you want it to appear.
Not having a well-structured account is like trying to drive a car that isn’t designed properly – accidents are inevitable.
A good account structure will help:
- Make sure that the search queries for which your ads are showing are relevant to your target audience.
- Get better quality indicators. Quality Score is essentially a scale of how well Google likes you.
- Keep your account organized and able to optimize. If your account is a mess, your results will most likely drop dramatically (or never be possible at all), and optimizing for better results is out of the question.
So remember account organization (and your own common sense) when structuring it.
The 6 most important components of a Google Ads account structure
It is important to have a complete understanding of each component of the account structure before getting started. So let’s quickly cover the basics.
Campaigns
Unless your account is very large, you’ll usually only have a few ad campaigns that cover broader topics. Each campaign will contain ad groups with keywords related to your text ads that point to your landing pages.
Ad groups
For each campaign, you’ll create corresponding ad groups that are a bit more specific than campaigns. There is no recommended number of ad groups for a campaign. But, for example, if your organization received Google Ad Grants, you need to create at least two ad groups for each advertising campaign. This rule is mandatory and directly affects the continuation of the advertising grant for your NGO. Ad groups contain keywords (no more than 10-20 recommended) that will trigger text ads (2-3 per ad group) that will link to a relevant landing page.
Keywords
Keywords should be in every ad group and are very important in managing how your ad appears in search results. When someone types text into Google’s search bar, that text is called a “search query” that matches a keyword that triggers an ad to appear in search results. Each keyword will have a maximum cost-per-click, search match type, and quality score associated with it. It’s important to do thorough keyword research with your topic, get a specific understanding of match types, and refine and optimize your keyword strategy over time.
Negative keywords
Advertisers often overlook them, but they are very important to set up and develop in order to avoid wasting money on irrelevant searches. Especially if you’re using broad match and/or modified broad match keywords, you’re likely to get some completely irrelevant searches matching your keywords and ads. Continue to build a list of such words and check your search report to discover new negative keywords.
Ad text
This is the text that will appear when the ad is displayed. Each group should contain 2-3 ads that link to the appropriate landing page. It’s important to follow Google Ads guidelines to get your ads approved, A/B test your ads over time, and really highlight the benefits of your offer to outrank your competition in search results.
Landing pages
This is the destination where each ad will send the searcher (most often the offer or call-to-action page of your site). We recommend being very strategic with your landing pages, making sure that each ad points to a highly relevant page that not only displays the keywords you’re bidding on in that group, but also your ad text.
Now that we’ve covered the basics, let’s get down to what you need to do when creating an account.
Getting started: Google Ads account structure and keyword research
Step #1: Spend time deciding how you want to structure your account
This question comes up all the time: What account structure is ideal? There really isn’t a magic recipe for structuring your account, and several strategies can be successful.
Fortunately, there are several different methods that work well.
- Based on your website structure. How is your website structured? Do you have different tabs or pages for different products or offers? Do you value some product pages more than others? If your website is well structured (and it should be), then it makes sense to structure your Google Ads account in a similar way.
- By products/services offered. This is probably the same as the structure of your website. But think about the different services or products you offer and structure your account accordingly. Look at the different offers and decide which one is the best value. Spend some time defining your products and deciding how you want to allocate your budget between campaigns.
- Based on location. Is location important to your organization? If targeting a specific geographic area (geotargeting) is important, create a structure based on that. For example, create a campaign in Dnipro to offer your help or services to those within the radius of the city.
Of course, there are many other tactics for structuring your account. But the most important thing is to analyze and refine everything over time to eventually develop a rational structure that is easy to manage, monitor and optimize to get the best results over time.
So take your time, take your time to consider the different structuring methods and choose the one that works best for your organization. Once you’ve decided, you should map out your structure on a piece of paper or in an Excel document to get a complete visual idea of the campaigns and ad groups you’re going to create.
Cork #2: Do keyword research
So you’ve drawn up a beautiful account structure with campaign themes and ad group themes. Now it’s time to populate those ad groups with keywords. But how do you choose which keywords to use?
You need to do a thorough keyword research to make sure you’re choosing keywords that aren’t too competitive or that have low quality scores or search volume.
Start by reviewing each ad group and saving an ordered list of them in an Excel document. Then use Google Keyword Planner to find the right keywords for each ad group. Remember, it’s best to start small, using a small number of keywords per ad group (10-20 max). Once you have a list of keywords for each group, it’s time to dig in and start building your Google ad account.
Creating account Google Ads and the first campaign
Step #3: Create your first campaign
Now it’s time to get started and create your first campaign. Start with what has the highest priority and work your way up.
The first thing you need to do is review your campaign settings. This part isn’t difficult, but advertisers tend to make careless mistakes that can cost a huge chunk of their marketing budget. Moral of the story: Be careful and check your settings carefully.
Double check the following items:
- Type. By default, the option “Search network with the possibility of display in the context-media network (CMS)” will be set. This option works well for certain advertisers who are trying to get as much exposure as possible. But keep in mind that this will allow your text ads to appear outside of search, on the Google Display Network (ie, on different websites).

- Location and language. Make sure you’re targeting the correct region and language for this campaign.
- Strategy. If you don’t want Google to make decisions for you, you should set options manually to control your budget. By default, Google Ads can choose its bid strategy, so be sure to change that.

- Default rate and budget. The default bid is simply the maximum cost per click on the ad that will be associated with each keyword you add. This can be easily changed for each keyword – just set the cost per click that is optimal for you.
Step #4: Create your first ad group and text ad
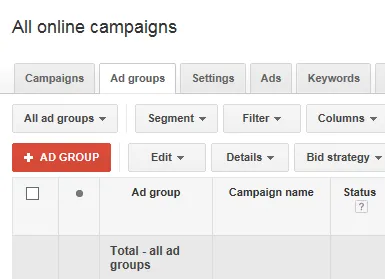
For your campaign to work properly, you need advertising. As we mentioned, ads are tied to a list of keywords in a group, so the first thing we need to do is create a new ad group. On the Campaigns tab in Google Ads, you’ll see an Ad Groups tab and a red +Ad Group button. Select it and choose a name.
Next, you’ll need to create your first ad to get the group up and running. Consider these tips for creating your ad copy:
- Character limit. Google will warn you when you exceed the character limit. However, we remind you that the ad title can contain two titles of 30 characters each and one summary line of description of 80 characters. You don’t need to worry about entering the URL, because it is generated automatically.
- Relevance. The ad text should reflect the keywords and text of the landing page. If you’re bidding on a generic keyword like “tennis shoes” and your ad says “women’s tennis shoes,” male searchers will be confused and won’t click on your ad. Clearly display your target keywords in your ad title and description lines.
- Best practices. There are many things you can do to get your ad noticed more than your competitor’s ad. For example, adding special sentences with numbers (people love numbers), using a period at the end of the Description 1 line, capitalizing each letter, etc.
- Follow Google’s ad approval guidelines. Opting out of ads is definitely not in your best interest. If it still happened – no big deal. However, this can negatively impact performance, delay ad serving, and of course, Google won’t like you very much (remember, they WANT to like you).
Directing to the most relevant landing page. Ideally, you’ll already have landing pages created for each ad group you’re running. If not, you should invest some time and resources to create them. If the landing page to which the searcher is directed does not correspond to the clicked ad, then the probability that he will return to the search and cause “abandonment” of your site is very high.
You can learn more about creating advertising campaign from our article. This guide is intended for organizations that have Creating account Google Ads, however, it can be useful for anyone running their business on Google.
Step #5: Add a list of relevant keywords to your ad group
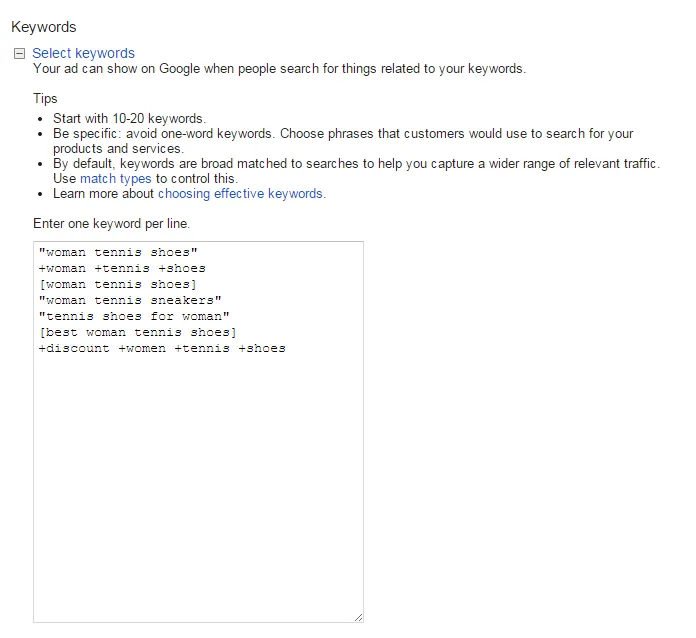
On the same screen, you will see a white box called “Keywords”. Here you can add a pre-created list of keywords. As a reminder, this list should be short (no more than 10-20 keywords) and extremely relevant to the ad text and the landing page to which users are directed by the ad.
Also remember that by default new keywords are added with broad match. Use appropriate punctuation to indicate match types.
For example, use:
- quotation marks around the “key phrase” (keyword from several words),
- brackets to indicate [exact match],
- plus signs to specify +modified broad match keywords.
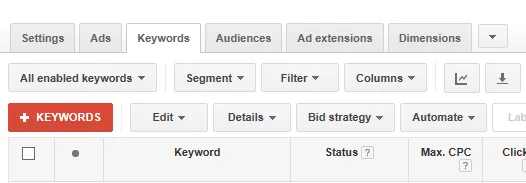
Once you’ve created an ad group with your ads and keywords, if you want to add more keywords – go to your ad group on the left sidebar, then go to the “Keywords” tab and select the red “+Keyword” button.
When you’re done Creating account Google Ads and your first ad group, ad text, and keyword list, select Save and proceed to billing.
Congratulations! You’ve successfully created your first campaign, ad group, text ads, and keyword list, but you’re not done yet.
Step #6: Create one or two more ads in your ad group and adjust your ad options
Now that your first ad group is up and running, you need to create at least one or two more ads. You should run at least two or three ads in each group to compare their performance. Your ads should be similar, but worded slightly differently. Maybe place the call to action in a different place or highlight different key points in each ad. This will allow you to test your ads and see what your audience is responding to.
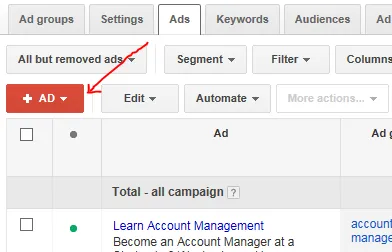
To create a new ad, first make sure you’re in the Campaigns section of your Google Ads account. On the left side of the page, select the ad group you just created and go to the ads tab. Select “+Ads” and start Creating account Google Ads a new text ad.
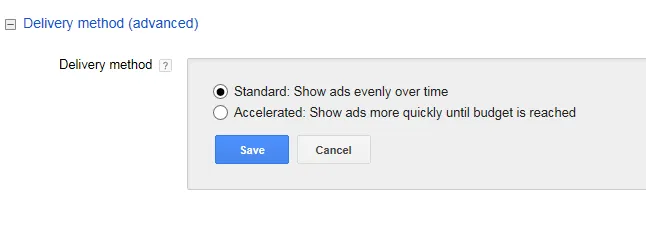
Once all of your ads have been created for that ad group, go to your campaign settings by selecting your campaign in the left sidebar and then selecting settings. There you’ll notice “Display Method” – this defines how you want your ads to appear on the search page. Make sure your ads are running on a regular basis so you don’t use up your budget too quickly throughout the day.
The last setting to adjust is “Show Ads”. This option determines how your ads are rotated. Alternate your ads with a vague term to evenly compare them against each other and see which ad text resonated more with your audience.

Creating account Google Ads completed.
What’s next? Repetition and development
It’s time to do it all again. As explained above, you’ll need multiple ad groups per campaign to distribute relevant keywords to campaign topics. Continue to grow your account structure.
If you have difficulties at any of the described stages and feel that you need help, contact CSO Digital specialists for advice. Our experts have created successful advertising campaigns on Google and helped to strengthen the digital presence of many companies and organizations.
Begin by entering your first and last name to establish your identity. The next crucial step is providing your email address; remember, it must be a business, branded, or corporate email, as generic email addresses are not accepted. This is to ensure a professional level of communication and to filter out non-serious inquiries.
You are also required to include your website’s URL. This is vital as it gives context and allows for a preliminary assessment of your online presence, which is integral to the audit process. Furthermore, you must clarify your status regarding NGO registration or your interest in Google Ad Grants. This information is essential for tailoring the audit to your specific needs and circumstances.
After you have filled in all these details with precision and care, review them to ensure accuracy and completeness. Submitting accurate and comprehensive information is crucial for a meaningful audit.